Tuesday, September 15, 2015

How I'm Attempting to Keep my House Spotless

I have no idea what has gotten into me lately, but I am turning into my mother.  The clutter started to drive me nuts.  Pretty soon I will be pulling a "Busie" aka my grandma.  I will be leaving sticky notes on doors and drawers about how they operate.  I started off with organizing my bathroom with dollar store baskets.  It was like heaven.  I also found some cheap, under the counter, bathroom storage drawers at TJMaxx. Its amazing that I don't have to throw junk around while searching in the bottomless pit of bathroom drawers for my mascara in the morning.  If you haven't done this yet, do it.  It will change your life!

The other thing I started was after looking at other similar documents online, I created my "Busie Cleaning Schedule".  This is my attempt at making my house look professionally cleaned while having two hellions...ok angels...running around.  I broke it down by room, and added what I should be doing weekly and daily.  If I'm working a 12 hr day obviously that may not happen, but hey my husband seems a lot happier!

Here is what mine ended up looking like.  I also attached some links if you would like to print a copy for yourself.  Have fun cleaning :)


Cleaning Schedule pg1
Cleaning Schedule pg 2

Saturday, September 12, 2015

Different Wooden Sign Techniques

Since I enjoyed making the wooden sign for our bedroom so much, I decided to jump into this hobby head first.  I asked Mike to not get rid of any of the scraps from our barn building project, and took apart an old entertainment stand for supplies. 

The first thing I tried was making something to hang on our front door for fall.  I found a wooden pumpkin sign at Joann's for about $10.  After researching the PVPP method, I painted it white first.  Then I used my silhouette software to make a Moroccan pattern with the duplicate function.  After cutting my stencil I placed it on the wooden pumpkin.  I then paint over the whole thing with orange paint.  In order to prevent the paint from peeling when I removed the vinyl, I quickly removed it before the paint could dry.  I then took a wooden "W" I found at Joanns, and after painting it white, I hot glued it to the middle of my sign. 

Ta da!  Switching up the wreath on my front door.

Next project coming up, a welcome sign for my front porch.

Wednesday, September 2, 2015

DIY Home Decor: Wooden Signs

If you happened to marry a man like I did, who is loathe to spend money on anything.  You have to think of creative ways to decorate your house.  Instead of spending over a hundred dollars in store, I spent around $20 putting this together with the help of my Cameo Silhouette (oh and my husband).

I started off going to a local hardware store, where I bought some 1x6's.  I also picked up some Rust-oleam Kona stain since I read other blogs raving about it.  Mike said we already had some polyurethane, so I didn't have to buy any of that.  I completed this project over about a week.  I wanted to make sure the stain and paints were dry, and I have two young toddlers.....so yeah.

Step one, choose your wood.  (insert snarky comment here).
Step 2: Stain.  I used one of Mike's old shirts, and I also wore plastic gloves since I knew this would get messy. 
Step 3: Polyurethane.  I used a small foam roller once the stain was completely dry the next day.

Step 4:  Attach your boards together.  We ended up using small wooden shims and lots of screws thanks to my husband's drill.  I've also read that using metal braces will help lighten the load of the sign.  Ta Da.
Step 5:  Decide on what you want on your sign.  Thanks to some awesome J14 mamas, I narrowed down my choices to decide on "together is our favorite place to be".  I used my Cameo Silhouette to make the stencils.  So you can learn from my mistakes, if you are going to use contact paper, spray some extra adhesive to it.  Otherwise it will not stick.  You can see the that "together" isn't as neat as the other words.  After that fail and before finding the spray adhesive trick, I switched to using some 631 I had laying around. 
**Another learn from my mistake moment.  Use make up sponges and dab the paint on.  Don't try and brush it on.  I pulled the vinyl off while the pain was still wet.  The smaller pieces inside the letters I waited till it was dry so I didn't smudge anything.

My final product:
I felt like it was too plain with just the words like I had planned, so I added a flourish design in the bottom left.  Besides the cost savings, I really enjoyed making this. 


Wednesday, June 4, 2014

The Great Breastfeeding Debate

After seeing how the article I posted earlier cause some reactions, I felt the need to explain some things.  I assume that everyone has had to same experience as me in regards to breastfeeding and that just isn't fair.  (here's the article in case you didn't see it.  Its fantastic.  http://www.motherhoodandmore.com/2013/08/whats-so-hard-about-covering-up-to.html?m=1)

Breastfeeding to me isn't just part of my job, its not just the way I'm choosing to feed my kids.  Its my PASSION.  Its almost been two years, that my angel of a father in law found me bawling my eyes out on my kitchen floor.  I was miscarrying for the second time.  My breastmilk had pretty much dried up because of it.  And I had just come home to find our deep freezer door opened a crack.  All my frozen stash ruined.  I was not ready to stop breastfeeding yet.  This is my last chance.  I am enjoying every single minute of it.  Yes the benefits to mom and baby are great, but honestly the main reason I am so for it is pretty selfish.  I have a mood disorder.  Breastfeeding is like the best antidepressant ever made.  So yes I fight for it.  I like feeling "normal".

A recurring theme I've noticed is that when people hear the phrase "breastfeeding in public"  they automatically get this picture in their heads of a tassel covering one nipple while the mother twirls her other stretched marked covered, bologna nippled boob around and somehow spraying milk in their child's mouth.  I want to clear that up.  I personally choose to use a blanket or hoodie to cover when I'm in public.  Not for your benefit, but for mine.  I'm human though.  Some days I forget a blanket, or diapers, or the damn diaper bag.  I'm not going to drive home with a screaming baby just to feed her so YOU won't be offended. 

And to further prove my point, picture evidence.

 #1 pre-kids obviously  If this doesn't bother you, the next two shouldn't.

 #2 latching
#3 feeding. 

Wednesday, December 4, 2013

A Glimpse Into The Mind Of A Habitual Aborter

I've been toying with the idea of putting this out there.  After the encouragement from my Jan14 mamas and a rough MFM appointment I figured I might as well.  Maybe it will feel good to get some things off my chest.

I wish that besides that new law in PA about touching a pregnant woman's belly, that they would add a law about commenting on the size of a pregnant woman.  The only acceptable thing to say is "You look great!".  Let me explain.  If you ask if a pregnant woman is sure there is only one in there or think they are due any day now at 30 weeks.  Congrats.  You just told someone who is already self conscious about their size that they are a Fatty Mcfatterson.  If you feel the need to comment on how small a pregnant woman is, you just inferred that she must not being taking care of herself or is somehow starving her unborn child.

The small comments are starting to slowly drive me crazy.  I try to look at it like my mom says and take it as a compliment, but I just can't.  Because of the PAI thing I have, I'm at risk for IUGR.  That's intrauterine growth restriction.  Not only does my uterus like to kill my babies.  It also tries to keep them from growing.  I've been getting monthly ultrasounds to check and make sure she is growing.  Now we're to weekly ones.  After hearing nothing but how small I am for 32 weeks from random strangers I went into this week's appointment a nervous wreck.  Cora was sleepy and wasn't moving like she normally is so I start to hyperventilate.  I ask the tech to show me her heart beat and by this time I am sobbing.  As she measures her head and belly all I can think of is how small she looks.  Then she measures her long legs that are just like Daddy's and I finally can breathe again. 

The only person that gets a free pass is my husband.  Because despite having "thighs like a linebacker" or an ass "that must be hungry because its eating" my underwear or who likes to play The Duck Song from YouTube as my theme song, I know he thinks I'm perfect and beautiful and sexy no matter what I look like.

Every time Cora does a major flip and then doesn't move afterwards I panic.  I'm convinced she just tied a knot in her cord or hung herself.  I contract non stop.  Today it was every 3-5 min.  I pray every day that they aren't hurting her.  I joke about how I hate all the pregnancy unicorns out there.  That have never had a bad outcome.  That have no idea all of the things that can and do go wrong.  That never feel a contraction until they go into labor.  Really I envy you.  You have no idea how lucky you are.


Saturday, November 23, 2013

Getting Ready for Christmas....Christmas Cards

Last year all I had was a point and shoot camera so I was super excited to see what this year's would turn out.  I took more time with these and adjusting my settings.  Connor was not a fan of the wrapping paper so this made this difficult.  I had bought a cute Santa hat for him to wear....yeah that wasn't happening.


I'm going to have to try the ones with the ornaments again.  The color was way off since I didn't take the time to figure out the setting.  Nap time was getting too close.
"Mom why do you do this to me?"


Wednesday, November 6, 2013

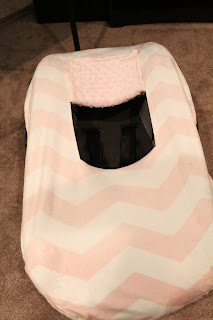
How To Make A Fitted Carseat Cover

For some reason all the tutorials I could find online were for more of a carseat canopy.  Since that's not practical for an Ohio winter, I decided to wing it.  I must say it didn't turn out too bad.  Since every carseat is different I'm not giving measurements though.  What I did was lay my fabric face down and place the carseat face down on top of that.

From there I cut my fabric making sure I had enough to reach where I wanted the elastic to sit.  I then flipped the carseat right side up and busted out the pins.  I started with the top and bottom, then sides and curves.  In my opinion the more you pin the easier this will be.
I sewed around the pins leaving about 1 cm seam to slide the elastic through.  I left about an inch gap where I could place the elastic.  Now I've used paper clips in the past where you tie the elastic to that and then work it through.  I find it easier to tie the elastic to a crochet hook and work that through.  I then placed the cover on the carseat and pulled the elastic tight to where I wanted it and trimmed.  I used a zig zag stitch to sew the two ends of elastic together and then finished closing that last inch gap.


Now for the window.  I eyeballed it then placed my pins.  Then I measured them and adjusted as needed.  After measuring a few times to be sure, I made my cut.


I wanted the window to look nice when open so I chose a matching pink minky that I sewed on the other side of the flap. 
I am doing velcro closures, but buttons are another fancier option.  For the velcro I'm doing one at the center of the flap when open.  And two at the bottom for when closed.  The finished product!