I've been toying with the idea of putting this out there. After the encouragement from my Jan14 mamas and a rough MFM appointment I figured I might as well. Maybe it will feel good to get some things off my chest.
I wish that besides that new law in PA about touching a pregnant woman's belly, that they would add a law about commenting on the size of a pregnant woman. The only acceptable thing to say is "You look great!". Let me explain. If you ask if a pregnant woman is sure there is only one in there or think they are due any day now at 30 weeks. Congrats. You just told someone who is already self conscious about their size that they are a Fatty Mcfatterson. If you feel the need to comment on how small a pregnant woman is, you just inferred that she must not being taking care of herself or is somehow starving her unborn child.
The small comments are starting to slowly drive me crazy. I try to look at it like my mom says and take it as a compliment, but I just can't. Because of the PAI thing I have, I'm at risk for IUGR. That's intrauterine growth restriction. Not only does my uterus like to kill my babies. It also tries to keep them from growing. I've been getting monthly ultrasounds to check and make sure she is growing. Now we're to weekly ones. After hearing nothing but how small I am for 32 weeks from random strangers I went into this week's appointment a nervous wreck. Cora was sleepy and wasn't moving like she normally is so I start to hyperventilate. I ask the tech to show me her heart beat and by this time I am sobbing. As she measures her head and belly all I can think of is how small she looks. Then she measures her long legs that are just like Daddy's and I finally can breathe again.
The only person that gets a free pass is my husband. Because despite having "thighs like a linebacker" or an ass "that must be hungry because its eating" my underwear or who likes to play The Duck Song from YouTube as my theme song, I know he thinks I'm perfect and beautiful and sexy no matter what I look like.
Every time Cora does a major flip and then doesn't move afterwards I panic. I'm convinced she just tied a knot in her cord or hung herself. I contract non stop. Today it was every 3-5 min. I pray every day that they aren't hurting her. I joke about how I hate all the pregnancy unicorns out there. That have never had a bad outcome. That have no idea all of the things that can and do go wrong. That never feel a contraction until they go into labor. Really I envy you. You have no idea how lucky you are.
Wednesday, December 4, 2013

Saturday, November 23, 2013
Getting Ready for Christmas....Christmas Cards
Last year all I had was a point and shoot camera so I was super excited to see what this year's would turn out. I took more time with these and adjusting my settings. Connor was not a fan of the wrapping paper so this made this difficult. I had bought a cute Santa hat for him to wear....yeah that wasn't happening.


I'm going to have to try the ones with the ornaments again. The color was way off since I didn't take the time to figure out the setting. Nap time was getting too close.


 |
| "Mom why do you do this to me?" |

Wednesday, November 6, 2013
How To Make A Fitted Carseat Cover
For some reason all the tutorials I could find online were for more of a carseat canopy. Since that's not practical for an Ohio winter, I decided to wing it. I must say it didn't turn out too bad. Since every carseat is different I'm not giving measurements though. What I did was lay my fabric face down and place the carseat face down on top of that.
 From there I cut my fabric making sure I had enough to reach where I wanted the elastic to sit. I then flipped the carseat right side up and busted out the pins. I started with the top and bottom, then sides and curves. In my opinion the more you pin the easier this will be.
 I sewed around the pins leaving about 1 cm seam to slide the elastic through. I left about an inch gap where I could place the elastic. Now I've used paper clips in the past where you tie the elastic to that and then work it through. I find it easier to tie the elastic to a crochet hook and work that through. I then placed the cover on the carseat and pulled the elastic tight to where I wanted it and trimmed. I used a zig zag stitch to sew the two ends of elastic together and then finished closing that last inch gap.
 Now for the window. I eyeballed it then placed my pins. Then I measured them and adjusted as needed. After measuring a few times to be sure, I made my cut.
I wanted the window to look nice when open so I chose a matching pink minky that I sewed on the other side of the flap.
 I am doing velcro closures, but buttons are another fancier option. For the velcro I'm doing one at the center of the flap when open. And two at the bottom for when closed. The finished product!
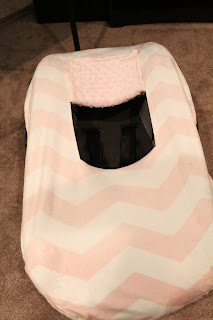


I wanted the window to look nice when open so I chose a matching pink minky that I sewed on the other side of the flap.


Tuesday, November 5, 2013
A Different Option For Your Little One's Name in the Nursery
For Connor's room, I went the easy route and bought a decal of his name off Etsy. Since I've learned a lot in the last almost two years, I've been toying back and for with what to do for Cora's nursery. Since we did such a fancy accent wall with the stencil (I will show you that in a later post when its completely done :) ) I didn't want it to seem too busy. I settled on making a C on fabric and sewing different colored turquoise buttons inside it then framing it. My mom threw a wrench in the plan when she told me about these wooden letters our Joann's had started to carry. They only cost 4 bucks a piece so I figured what the heck I'll give it a try.
This is what I used. Scrapbook paper, mod podge, wooden letters, and glue gun. Not pictured is ribbon, because this child is sucking my brain cells by the second.
 Step #1 place your chosen piece of scrap book paper face down and then place your wooden letter face down on top of that. Trace around the letter making sure you're tight with it. For the special people who need pictures like myself, here ya go.
 Step #2 cut out your letter very carefully so everything lines up. I chose to leave my letters white, but if that doesn't fit in your color palette you can paint the letters so the sides match what you're working with. Paint a coat of mod podge on your letter (now facing up of course) and then carefully line up your piece of cut paper and smooth down. Do another coat of mod podge on top of the paper and let dry 10-15 min.

 Step #3 is when the glue gun comes into play. Now I haven't used one since the incident at the schizophrenic center of 2005, but I'm happy to say no one was injured and I didn't glue anything I wasn't supposed to. OK I might have burnt my finger, but nothing too bad ;) (Basically I accidentally hot glued the art project I was teaching in group during psych clinicals and was comforted by my patients...) Tie your ribbon and place on your letter how you see fit. I chose to use a bow to hang my letters, but you could also use command strips or double sided tape if you don't want the ribbon look. Use your trust hot glue gun to attach your ribbon to the back of your wooden letter and let dry. Trim your excess ribbon and voila! A cheap and easy way to bring your little one's name into the decorations of their room!

This is what I used. Scrapbook paper, mod podge, wooden letters, and glue gun. Not pictured is ribbon, because this child is sucking my brain cells by the second.


Thursday, October 24, 2013
Pinterest Makes Me A Better Mom
I think since I was in the hospital over the weekend, Connor really was missing his mama. My usually independent child has been glued to my side since I got home. Well unless Mike is home of course. And don't worry. Cora is doing fine and staying put. My uterus just doesn't like to be pregnant I guess. With it getting colder out, I'm starting to get desperate for finding things for us to do during the day. Puzzles have become my enemy. Connor will try for 0.2 seconds to get the piece in then throw it at me and shout "Mama!" disgustedly. Someone has my temper....
Thank God for Pinterest. I am probably the least crafty person alive, but I've found such cute ideas. Here are the art projects we did today.


Thank God for Pinterest. I am probably the least crafty person alive, but I've found such cute ideas. Here are the art projects we did today.

We also went to the Hayes house and played in the leaves a bit. Connor really was freaked out about wearing gloves. But then they started mowing the grounds and he was in heaven. A boy and his lawn mower....


Thursday, September 19, 2013
Cora's Room: Wallpaper and Glue Removal
I may have done a little happy dance when we started this project. Goodbye hunting room! As my husband took down the deer heads and moved the gun cabinet I realized some very sad news. My husband loves borders. The small strip of wallpaper basically was taunting me. After some advice from some very smart bumpies, I attacked this first project of Cora's nursery. If you have a border or wallpaper that needs removed, this is what worked very nicely for us.

First, we used Dawn and hot water in a spray bottle. Spray small sections of the border then wipe with a rag. Before it dries, use the scraper. Once you get a good piece started, start pulling. Repeat till done. This room took my husband about 2 hours.
Once he was done there was still areas of glue on the wall. This time I used hot water and vinegar in the spray bottle. Instead of spraying it on the wall, I just used a few sprays on a sponge. A little elbow grease and the glue came right off. Any normal human this would probably take about 30 minutes. This anemic pregnant woman it took about an hour.
As a whole, it was a whole heck of a lot easier than I expected. The end result:

What you'll need: spray bottle, plain Dawn dish soap, white vinegar, a scraper, a sponge, and HOT water
Here's a before shot so you understand what was living down the hall from me.

First, we used Dawn and hot water in a spray bottle. Spray small sections of the border then wipe with a rag. Before it dries, use the scraper. Once you get a good piece started, start pulling. Repeat till done. This room took my husband about 2 hours.
Once he was done there was still areas of glue on the wall. This time I used hot water and vinegar in the spray bottle. Instead of spraying it on the wall, I just used a few sprays on a sponge. A little elbow grease and the glue came right off. Any normal human this would probably take about 30 minutes. This anemic pregnant woman it took about an hour.
As a whole, it was a whole heck of a lot easier than I expected. The end result:

Thursday, September 12, 2013
Operation Keep Connor Busy
The past week or so, Connor has officially been acting like a toddler. I spent the night researching on Pinterest, trying to find activities that would keep him occupied and lessen the whining. This is what we did today. I might add that all of this was done with a children's iheart station playing for dance party breaks.
#1 Pipe Cleaners and Colander
What a huge success! He did this for 30 minutes straight. It took him a little bit to figure out how to actually get them in the holes, but filling up the strainer was just as fun.

#2 fabric balls and cupcake pan
This one he liked to, just not as much as the first. He "counted" as he placed each ball. We practiced numbers and colors. This kept him occupied for about 20 minutes.

#3 Play Doh
He actually liked playing with the cups more than the play doh. Every time he would touch the play doh he'd look at me with this "ew" face. I bought a set that had a truck which is a favorite of his right now so this was a solid 30 min plus of play.

 #4 Stringing beads with play-doh and pipe cleaner
Big. Fat. Fail. I saw this using fruit loops instead of beads as well, but he isn't quite there yet. I ended up just stringing the beads myself and them letting him take them off and put them away. This only gave me maybe 10 minutes.

#1 Pipe Cleaners and Colander
What a huge success! He did this for 30 minutes straight. It took him a little bit to figure out how to actually get them in the holes, but filling up the strainer was just as fun.

#2 fabric balls and cupcake pan
This one he liked to, just not as much as the first. He "counted" as he placed each ball. We practiced numbers and colors. This kept him occupied for about 20 minutes.

#3 Play Doh
He actually liked playing with the cups more than the play doh. Every time he would touch the play doh he'd look at me with this "ew" face. I bought a set that had a truck which is a favorite of his right now so this was a solid 30 min plus of play.


Big. Fat. Fail. I saw this using fruit loops instead of beads as well, but he isn't quite there yet. I ended up just stringing the beads myself and them letting him take them off and put them away. This only gave me maybe 10 minutes.

Subscribe to:
Posts (Atom)